Doughnut Holes!

It always surprises people when I tell them that I’m not a huge fan of doughnuts. Personally, I find them to be just a bit too much, and I can never eat an entire one! Homemade doughnuts, on the other hand, are hard to resist. Today, a friend of mine and I (shoutout to Dalya) decided to try out a doughnut hole recipe–and it went surprisingly well! We loved the recipe and recommend them to everyone. You can find a recipe here.

IMG_7539Ingredients:

  • 1 1/4 cups unbleached all-purpose flour
  • 1/3 cup sugar
  • 2 teaspoons baking powder
  • 1/2 teaspoon nutmeg
  • 1/2 teaspoon salt
  • 1 egg
  • 1/2 cup milk
  • 2 tablespoons melted butter
  • Vegetable oil
  • 1/4 cup sugar (for the topping) (optional)
  • 3 tablespoons cinnamon (for the topping) (optional)
  • 1/2 cup confectioners sugar (for the topping) (optional)

Preparation: 

  1. In the bowl of a stand mixer, combine flour, sugar, baking powder, nutmeg and salt. Add in milk, egg, and melted butter, and mix until well combined.
  2. Fill a large skillet or medium pot with vegetable oil, about 2 inches deep. Using a fry thermometer, heat oil to about 375°F. Make sure it stays around that temperature each time you fry the dough.
  3. Place cinnamon-sugar (mixed together) and confectioners sugar toppings in two separate small bowls. Set out several stacked paper towels next to the stove for drying the doughnut holes, along with a cooling rack with parchment paper underneath.
  4. When oil is ready, place about 5-6 teaspoonfuls of dough at a time in the oil and fry on each side for about 1 minute (2 minutes total). Remove from the oil and place on paper towel to soak up excess oil. Then, using a fork, roll doughnut in either the confectioners sugar or cinnamon-sugar mixture. Then place on cooling rack to cool slightly before serving warm.
    IMG_7536

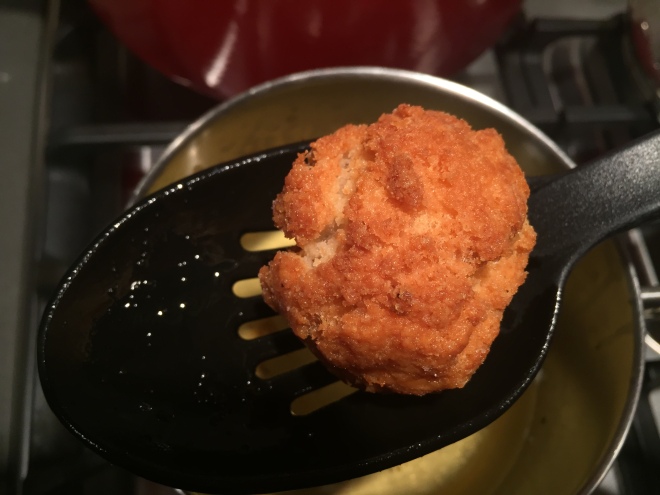
    Freshly Fried Doughnut Hole

    IMG_7528

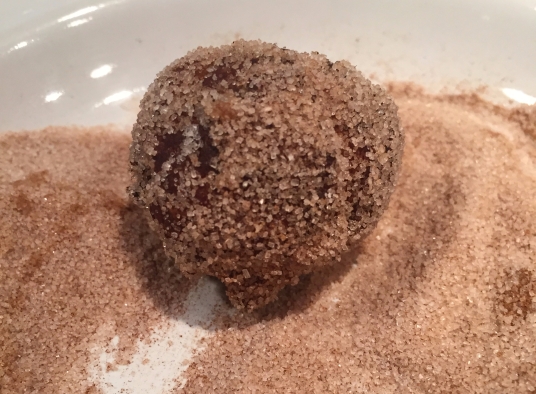
    Cinnamon Sugar Coating

    IMG_7537
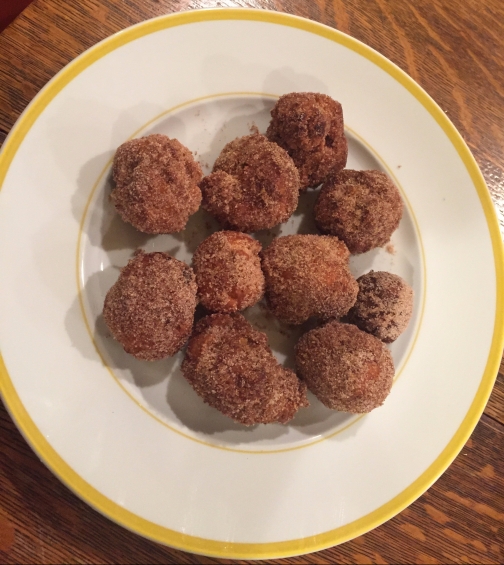
We found the doughnuts easier to control when the oil wasn’t as hot; we accidentally burnt the first few. But it was overall a great success! 

Vanilla Madeleines!

IMG_7409I used to always beg my mother to buy me madeleines whenever she went out to get coffee. Who doesn’t love a nice little cake that you can just pop into your mouth? Anyway, I recently got a new madeleine tin and knew that I had to try it out for myself! These were incredibly easy, and a big success. I got the recipe from epicurious, be sure to check it out!
IMG_7411

Ingredients:

  • 2 large eggs
  • 2/3 cup sugar
  • 1 teaspoon vanilla extract
  • 1/2 teaspoon grated lemon peel
  • Pinch of salt
  • 1 cup all purpose flour
  • 10 tablespoons (1 1/4 sticks) unsalted butter, melted, cooled slightly
  • Powdered sugar

Preparation:

  1. Preheat oven to 375°F. Generously butter and flour pan for large madeleines (about 3 x 1 1/4 inches).* Using electric mixer, beat eggs and 2/3 cup sugar in large bowl just to blend. Beat in vanilla, lemon peel and salt. Add flour; beat just until blended. Gradually add cooled melted butter in steady stream, beating just until blended.
  2. Spoon 1 tablespoon batter into each indentation in pan. Bake until puffed and brown, about 16 minutes. Cool 5 minutes. Gently remove from pan. Repeat process, buttering and flouring pan before each batch. (Can be made 1 day ahead.)
  3. Dust cookies with powdered sugar.

IMG_7410
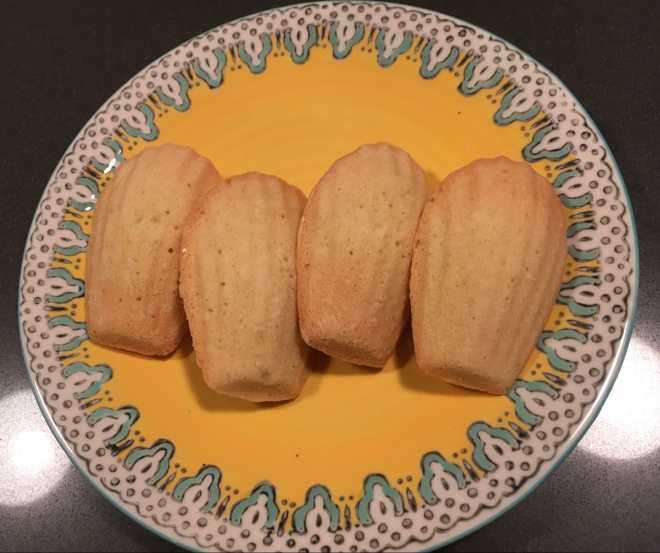
Let me know if you give these a try, I 100% recommend them!

Pumpkin Cake with Maple Brown-Butter Glaze

IMG_6206

As Hannah Montana once said: Everybody makes mistakes, everybody has those days. Today was just one of those days, you guys! Firstly, I began making this cake and everything was going pretty well. I like to keep my ingredients with me on the counter to stay organized and to make sure I don’t forget anything. It’s not a foolproof system–clearly because I forgot the egg! Anyway, I realized my mistake as the cake was baking and quickly pulled it out in an attempt to save it. I thought I had preserved it but later on I had trouble determining if the cake was completely cooked. It wasn’t. But I’ll get to that later. Despite my many trials and tribulations, I would still recommend this recipe–especially the glaze! I got it from the New York Times Cooking website (go check it out!).

Ingredients:

  • 3 cups/384 grams all-purpose flour
  • 2 teaspoons baking powder
  • 1 teaspoon baking soda
  • 1 ¼ teaspoons kosher salt
  • 2 teaspoons ground cinnamon
  • 1 ½ teaspoons ground cardamom
  • ¼ teaspoon ground allspice
  • ¼ teaspoon ground black pepper
  • 2 cups/440 grams light brown sugar, packed
  • ½ cup/114 grams unsalted butter, soft but cool
  • ½ cup extra-virgin olive oil
  • 2 large eggs, at room temperature
  • 1 (15-ounce) can/425 grams pumpkin purée
  • ½ cup sour cream

For the glaze:

  • 2 tablespoons unsalted butter
  • 1 cup/102 grams confectioners’ sugar, sifted
  • ¼ cup maple syrup
  •  Pinch of salt
  • 1 to 2 tablespoons lightly toasted pepitas(optional)

Preparation:

  1. Heat oven to 350 degrees, and butter and flour a 12-cup (or larger) capacity bundt pan.
  2. In a medium bowl, whisk the flour, baking powder, baking soda, salt, cinnamon, cardamom, allspice and black pepper until well combined.
  3. In the bowl of a stand mixer fitted with the paddle attachment, combine brown sugar, butter and olive oil. Beat on medium-high until light and fluffy, about 3 minutes. Add the eggs one at a time, mixing for about 20 seconds in between each egg. Add the pumpkin purée and sour cream, and mix until well combined, scraping the bottom and sides of the bowl as necessary.IMG_6200
  4. Remove the bowl from the mixer, and use a rubber spatula to fold in the dry ingredients until well combined. Make sure to scrape the bottom and sides of the bowl to ensure an evenly mixed batter.
  5. Pour the batter into the prepared pan, smooth the top and firmly tap the pan on the countertop a few times to release any large air bubbles. Bake the cake until golden and puffed, and a tester inserted into the center comes out clean, 55 to 65 minutes.
  6. Set the cake, still in its pan, on a rack to cool for 20 minutes, then use the tip of a knife to loosen the edges and invert the cake onto the rack to cool completely before glazing.
  7. Make the glaze: Once the cake is cool, melt the butter in a saucepan over medium heat. Cook the butter, occasionally scraping the bottom and sides of the pan with a rubber spatula until it turns a deep golden brown and smells nutty. Don’t walk away from the pan during this process. The butter can go from brown and nutty to acrid and burnt in mere moments.
  8. Transfer butter and all the brown bits from the pan to a heat-safe bowl, and let it cool slightly. Whisk in the confectioners’ sugar, maple syrup and salt until smooth. The glaze should be thick but pourable. If it’s too thin, add a bit more confectioners’ sugar. If it’s too thick, add a few drops of water (I did this a few times).
  9. Transfer the cake to a serving platter and pour the glaze evenly over the top. Sprinkle with pepitas if desired. Let the glaze set for a few minutes before slicing.

IMG_6207

I mentioned that I was having some trouble determining if the cake was fully cooked. Well, I ended up taking it out of the oven a little bit too soon and slathering it in glaze, only to discover it could have been kept in for a good 15 more minutes, if not more. But you live and you learn, right? Anyway, I will be making this cake again because even though I continuously messed up, it’s still a great recipe that I strongly recommend! Thanks for reading!

IMG_6208

Chocolate Chip Cake!

Who doesn’t love the ever versatile chocolate chip? They can be found in cookies, muffins, or are tasty just plain! So today I decided to make a chocolate chip cake. Yum! img_7247.jpg

Here’s the recipe, I got it from Genius Kitchen:


Ingredients:

  • 1cups sugar
  • cups flour
  • teaspoons baking powder
  • teaspoon baking soda
  • 12teaspoon salt
  • 1cups sour cream
  • 34cup margarine or 3cup butter, softened
  • teaspoon vanilla
  • eggs
  • 1cup sugar (for cinnamon sugar)
  • teaspoon cinnamon
  • 1(6 ounce) package chocolate chips (mini or regular)

Preparation:

  1. Heat oven to 350 degrees.
  2. Grease (not oil) a 13 x 9 pan.
  3. In large bowl, combine first 9 ingredients.
  4. Mix well by hand or use a mixer at medium speed for about 3 minutes.
  5. Pour half of the batter (about 2 1/2 cups) into the prepared pan.
  6. In separate small bowl, combine the sugar and cinnamon.
  7. Sprinkle half of the sugar mixture and chocolate chips (1/2 cup) over batter.
  8. Repeat with remaining batter, sugar mixture, and chocolate chips.
  9. Bake at 350 degrees for 30-35 minutes or until toothpick inserted in center comes out clean.

IMG_7246

This cake was a great success! I’d be interested to try it next time in a bundt pan, I think that would work well. Thanks for reading!IMG_7252

Fluffy No-Bake Cheesecake!

IMG_7080
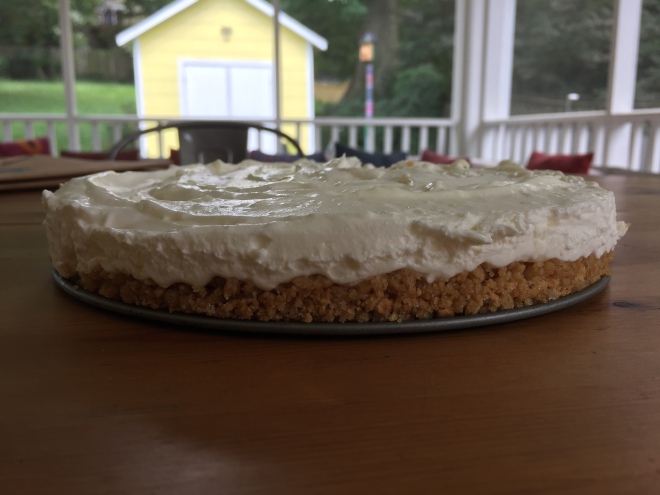
Oh boy, I may be back at school but you better believe I’m still experiencing the summer humidity. Sometimes it’s just too unpleasant to even think about turning on the oven. This cheesecake recipe is the perfect solution! Who doesn’t like a good, light cheesecake that you don’t even have to stick in the oven? I personally enjoy a nice thick crust too, but that’s totally up to you! I got my crust recipe from here, it’s an old reliable.

Anyway, I found this recipe on a super cute, super cool blog called The Hungry Traveleryou should pay them a visit!

Ingredients: 

  • 1.5 cups heavy cream, chilled
  • 1/2 cup (62.5 grams / 2.2 ounces) powdered sugar
  • 1 package (8 ounces) cream cheese, softened
  • 1/3 cup (67 grams / 2.4 ounces) granulated sugar
  • 1 cup sour cream
  • 1 tablespoon vanilla extract
  • 9-inch graham cracker crust, baked

Preparation:

  1. In the bowl of a stand mixer fitted with the whisk attachment, on medium-high speed, whip the heavy cream and powdered sugar just until stiff peaks form. Scrape the whipped cream into a clean bowl and refrigerate until step 3.
  2. Using the same stand mixer bowl (you don’t need to wash it), fitted with the paddle attachment, beat the cream cheese until smooth, about 2 minutes on high speed. With the mixer on low, gradually add the sugar and then mix on medium-high speed until smooth. Scrape down the sides and bottom of the bowl then add the sour cream and vanilla and mix until combined.
  3. Remove the bowl from the mixer and take the whipped cream out of the refrigerator. Gently fold the whipped cream into the cream cheese mixture until fully incorporated and homogenous. Spoon the filling into the prepared graham cracker crust and refrigerate for 4 hours or until set.IMG_7082

This cheesecake is super tasty and easy to make! You all should definitely try it out.

I hope you’ve all had a great September so far! It’s crazy to think that 2017 has gone by as fast as it has. I’ll see you next time!

Short Crêpe Cake!

IMG_7063
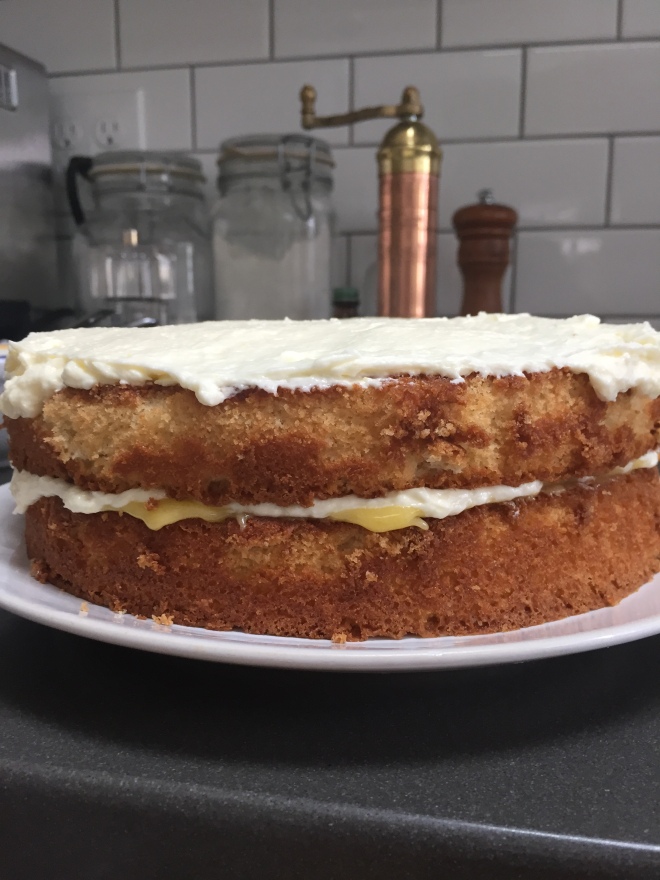
I have always wanted to make one of those extravagant crêpe cakes I’ve seen on my Instagram feed every now and then. Today, I attempted to do just that…but I forgot one of my most important baking rules. Always plan ahead! Anyway, I spent a long time baking several crêpes and when I finally went to add the layers of whipped cream, I realized halfway through that I didn’t have enough cream. That explains the title of this post, or at least the “short” part.
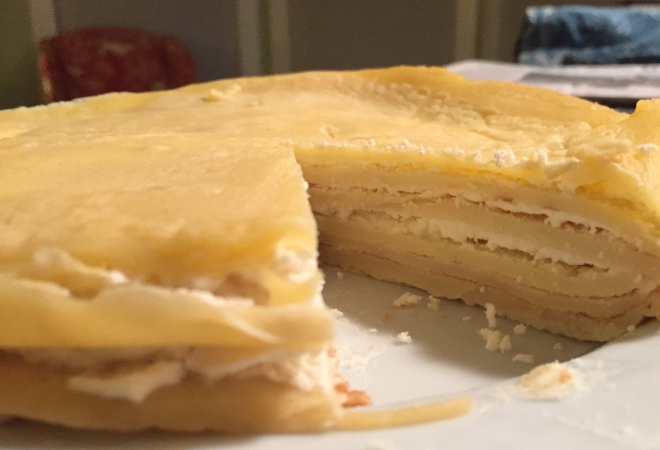
Despite its stature, this “cake” was delish! I would definitely recommend, especially if you have enough whipped cream to make the cake even taller. Here’s a great crêpe recipe!

IMG_7061Ingredients:

Preparation:

  1. In a large mixing bowl, whisk together the flour and the eggs. Gradually add in the milk and water, stirring to combine. Add the salt and butter; beat until smooth.
  2. Heat a lightly oiled griddle or frying pan over medium high heat. Pour or scoop the batter onto the griddle, using approximately 1/4 cup for each crepe. Tilt the pan with a circular motion so that the batter coats the surface evenly.
  3. Cook the crepe for about 2 minutes, until the bottom is light brown. Loosen with a spatula, turn and cook the other side. Serve hot.

Hope you enjoy!

Peanut Butter, Banana, and Chocolate Ice Cream! (Plus it’s vegan?!)

IMG_7017
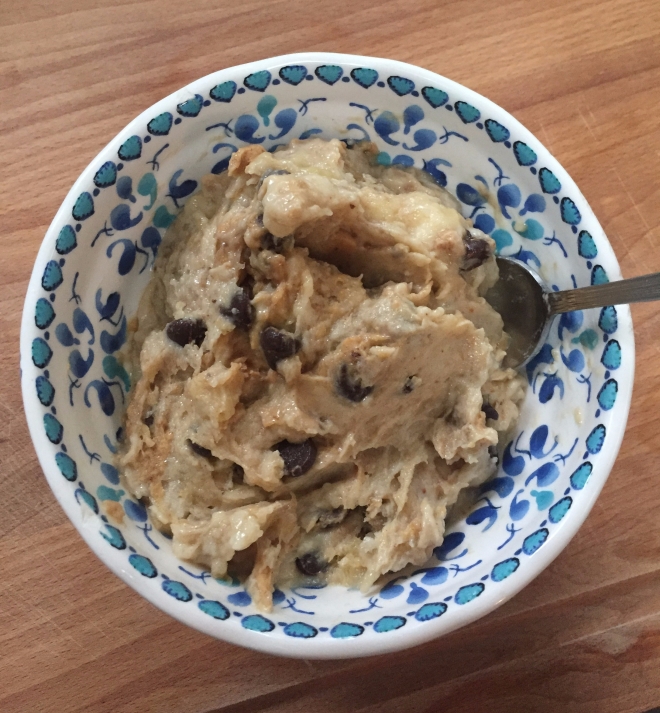
Confession: I only learned that my family has a food processor a few days ago.

I know! Imagine all the pie crusts I’ve toiled over when I could’ve just quickly whipped them up in the food processor. Anyway, today I used it to make a brand new recipe for me.

I can’t think of a more iconic duo than peanut butter and banana. Add chocolate to that, and wow! The three flavors complement each other so nicely. Today, I wanted to try something quick and easy, but also delicious. This is definitely your recipe if that’s what you’re searching for. And it’s vegan!

Who knew ice cream could be vegan? I certainly didn’t, but I discovered a whole new world today. Instead of cream, milk, and sugar, I can use frozen bananas. Incredible. Here’s the recipe:

Ingredients (1 serving):

  • 2 sliced and frozen bananas
  • 2 Tbsp natural peanut butter
  • 3 Tbsp raw cacao nibs
  • Pinch sea salt
  • Drizzle of agave (or maple syrup), optional

Preparation:

1. Place frozen banana slices in a food processor and run the machine until it resembles a crumb like consistency.
2. Add peanut butter, cacao nibs, sea salt and agave, and whiz a little longer until you get a soft-serve ice cream consistency.IMG_7019

And that’s it! How simple, yet how tasty! I hope you enjoy!

Peach Cupcakes!

IMG_5378
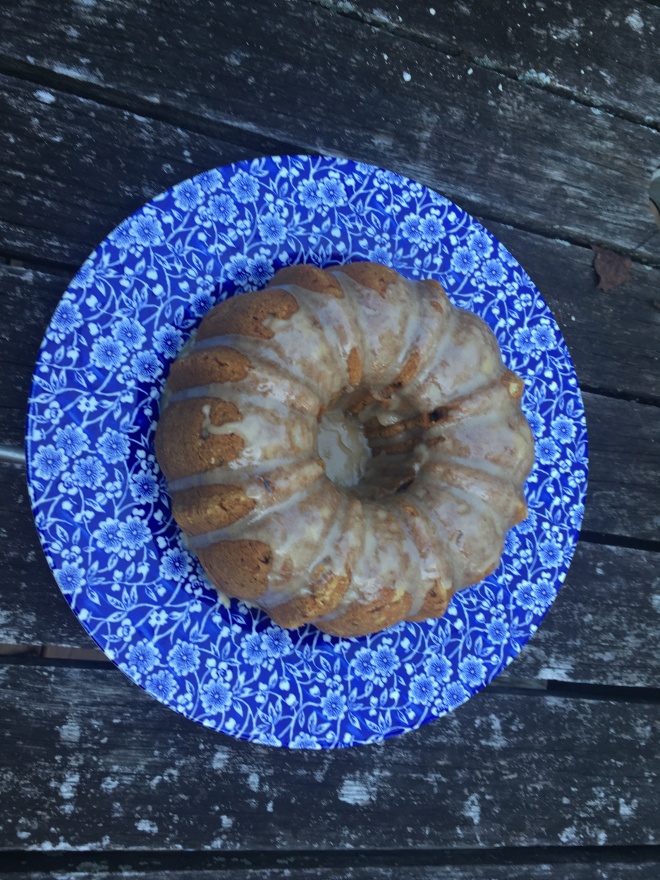
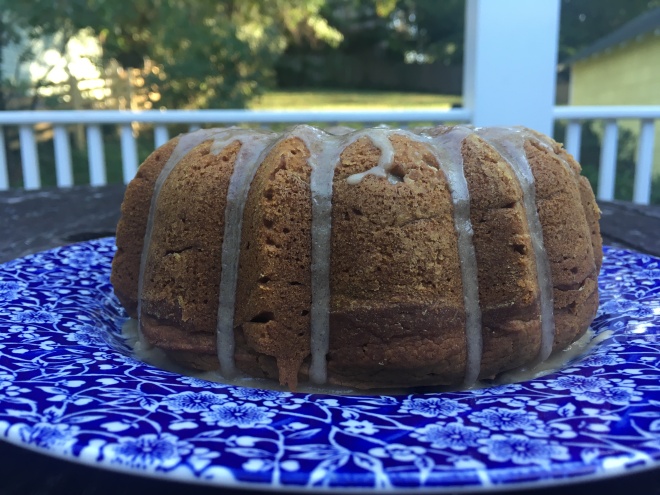
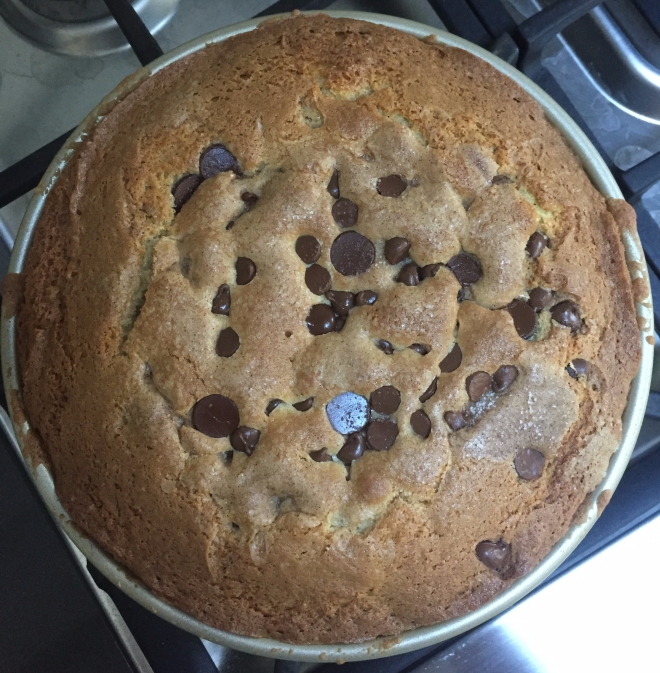
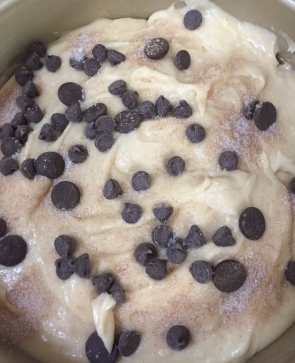
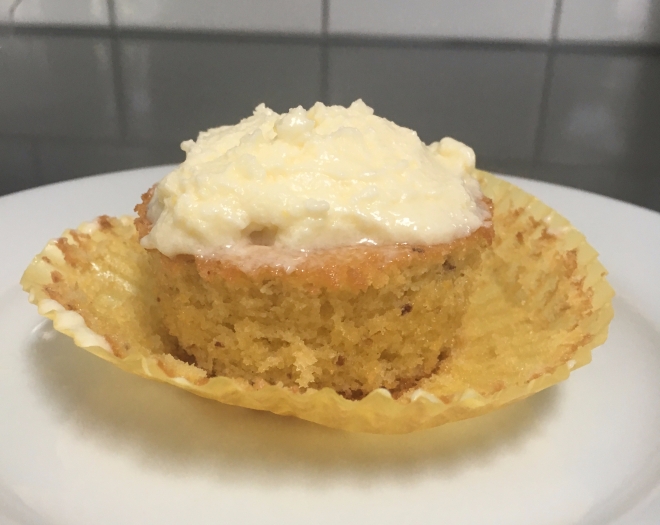
As the days towards the beginning of a new school year go by, I am constantly reminded of how quickly summer seemed to slip by. The days of eating fruit outside and sleeping in to my heart’s content are soon to be lost. Luckily for me, I decided to try out a new recipe for a “Peach Cake“. I decided to use the recipe for cupcakes to get rid of some leftover frosting I had, and they were the perfect summer treat. As my mom says, “A nice punctuation mark at the end of a nice summer.” Here’s how I did it:

Ingredients:

  • 3 ½ cups sifted cake flour
  • ½ teaspoon salt
  • 3 ¾ teaspoons baking powder
  • ¾ cup salted butter, softened
  • 2 ¼ cups granulated sugar
  • 3 large eggs
  • 1 teaspoon pure vanilla extract
  • ½ tsp pure almond extract
  • 1 cup washed, pitted and pureed peaches

Preparation:

Sift together the flour, salt and baking powder. In the bowl of an electric mixer fitted with a paddle attachment, beat together the butter, sugar, eggs, vanilla and almond extract for three minutes, scraping down the sides of the bowl as needed. Add the sifted flour to this creamed mixture a cup a time, alternating with the peach puree. Beat at medium speed for two minutes, scraping down the sides of the bowl halfway through.

IMG_7005
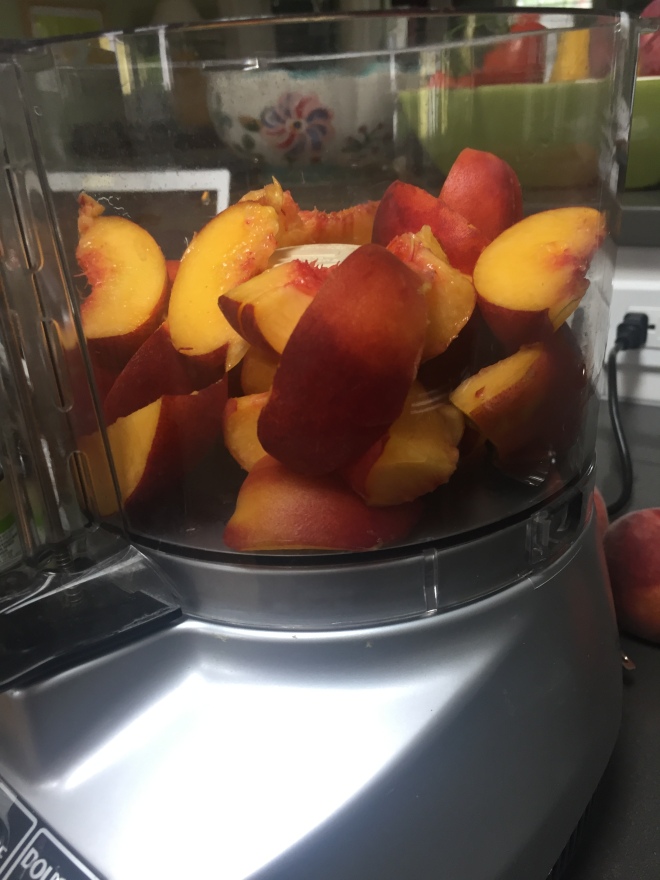
This is where I placed the batter into cupcake tins, but feel free to follow the original recipe here.

I would recommend these cupcakes to anyone who’s looking for one last tasty bite of summer! Or just anyone who loves good desserts. The peach flavor of the cupcakes was subtle, but still noticeable. img_5377.jpg

Some More S’mores! (Cookie Style)

img_6974.jpg

Can you say decadent? Today I was looking back on some of my older blog posts and I came across my s’mores bars. Not quite as visually appealing but I can assure you, equally as melt-in-your-mouth delicious. Anyway, after seeing that post I had the craving for s’mores that only one thing could satisfy…or maybe there’s more than the traditional graham cracker sandwich? You bet there is. Today I decided to make some s’mores cookies using a graham cracker cookie recipe and some marshmallow and chocolate.

First I made the cookies and I got the recipe from here.

Ingredients:

5 sheets graham crackers (5″ x 2.25″ graham crackers or 2 cups graham cracker crumbs)
1/4 cup granulated sugar
2 tablespoons packed dark brown sugar
1/2 teaspoon baking soda
1/4 teaspoon fine salt
6 tablespoons unsalted butter, melted and cooled (the next time I do this I plan on using a little less than 6)
1 large egg, lightly beaten
1/2 teaspoon vanilla extract

Preparation:

  • Arrange a rack in the middle of the oven and heat to 350°F. Line a baking sheet with parchment paper.
  • Process the graham crackers in a food processor fitted with the blade attachment until they are completely broken down into crumbs and have a sandy texture. Transfer to a large bowl.
  • Add the sugar, brown sugar, baking soda, and salt and whisk to combine. Add the butter, egg, and vanilla, then stir together with a rubber spatula until just combined into a soft dough.
  • Using a spoon or cookie scoop, measure 1 1/2 tablespoons of dough from the bowl. Roll between the palms of your hands to form a ball, then place on the baking sheet. Repeat with forming the remaining dough, spacing the dough balls about 2 inches apart.
  • Bake until the cookies have spread and the edges are lightly browned, 8 to 10 minutes. Let the cookies cool on the baking sheet for 5 minutes, then use a flat spatula to transfer to them to a wire rack to cool completely.


IMG_6967
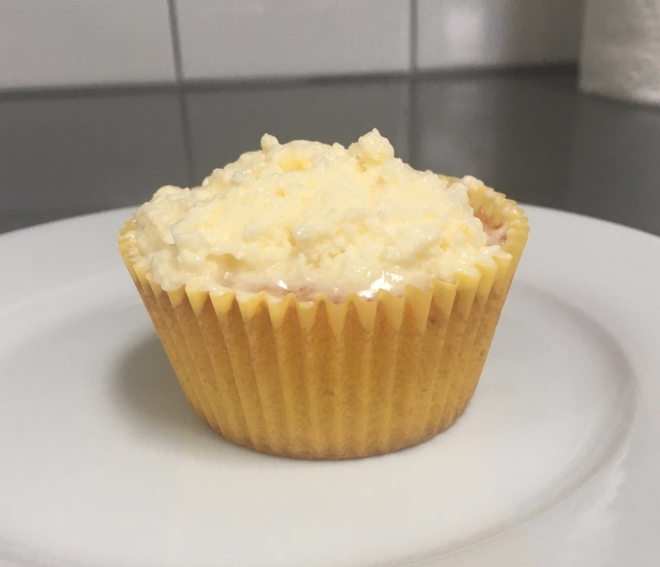
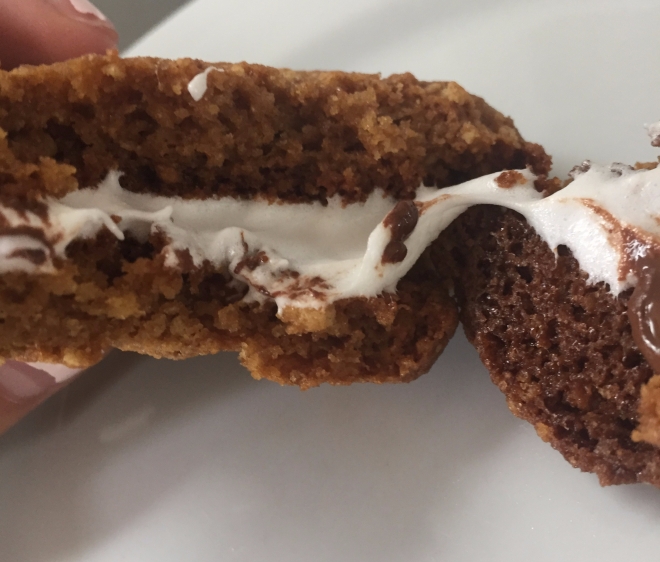
Next, while the cookies were still hot, I flipped them over and placed marshmallows and chocolate chips on top. IMG_6973
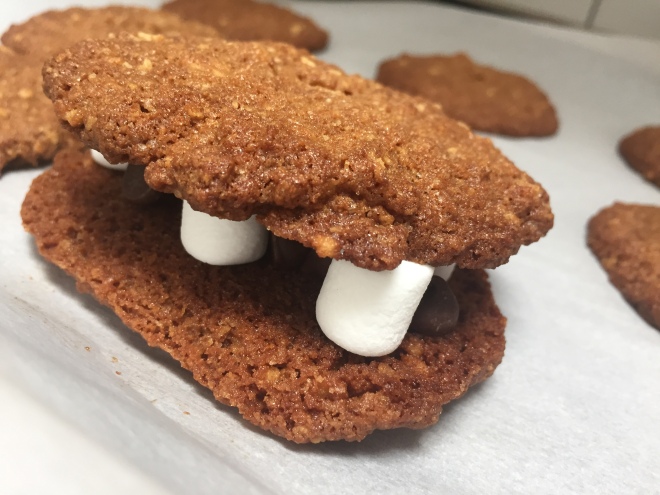
The inside wasn’t melting as much as I had hoped, so I popped them back in the oven using the remaining heat for baking the cookies. It worked perfectly! Who doesn’t love a nice cookie with the flavor of a childhood favorite dessert?IMG_6975

Lemon Buttercream Birthday Cake

Hi everyone! Today is a pretty special day…it’s the first time I tried this amazing cake recipe! Oh, it’s also my birthday today. In case you’re new, or you haven’t noticed, I love lemon. So what better occasion to try out a new lemon buttercream cake? I got this recipe from the Miette cookbook by Meg Ray with Leslie Jonath. This book is amazing. But like last time, I can’t directly provide you with the exact recipe. I will, however, give you some similar recipes to that like the one I used. IMG_6916

The cake was called “hot milk cake”. Again, this is not the exact recipe I used, but here is a similar one.

I made two separate cakes in order to layer them. The next step was to create a lemon simple syrup, which I brushed over the tops of the two cakes to give it an extra lemony taste.

Finally, I made a lemon buttercream frosting. Now, the recipe from Miette is really light, fluffy and amazing, so I recommend purchasing the cookbook. I did find the recipe online, however, here.

Ingredients
2 cups sugar
1/3 cup water
5 large egg whites
1 teaspoon cream of tartar
3 cups unsalted butter, at room temp
2 tablespoons vanilla extract

Preparation
1. In a small saucepan over medium heat, combine the sugar and water. Clip a candy thermometer to the side of the pan. Cook the mixture until it reaches 248 degrees F, 5 to 10 minutes, keeping a constant eye on it.

2. Meanwhile, combine the egg whites and cream of tartar in the bowl of a stand mixer fitted with the whisk attachment. When the sugar syrup reaches 240 degrees F, whisk the egg whites on medium-low speed until soft peaks form. Slowly pour in the syrup, raise the speed to high, and whisk until soft peaks form.

3. When the sugar syrup reaches 248 degrees F, immediately pour into a heat-proof measurer. Reduce speed to low and very carefully drizzle the syrup into the mixer bowl, away from the whisk so the hot syrup doesn’t spatter. Be careful because the syrup is very hot. When you have added all of the syrup, raise the speed to high and beat until the mixture is cool to the touch (an instant-read thermometer should register 65 to 70 degrees F), 5 to 10 minutes.

4. Only when the meringue is cool enough should you begin adding the butter. Reduce the speed to medium. With the mixer running, drop in the butter, 1 tablespoon at a time, waiting until each is incorporated before adding another. The mixture may deflate and begin to look curdled. Raise the speed to high and continue to add tablespoon-size pieces of butter, making sure each is completely combined before adding more. When all of the butter has been added, the frosting should be smooth and thick. Add the vanilla and mix to combine.

5. Use the buttercream immediately, or cover and refrigerate until needed. Store in a zippered plastic bag for up to 1 week in the refrigerator and up to 2 months in the freezer. (To thaw, leave in the refrigerator overnight, not on the countertop.) To use buttercream that has been chilled, remove from the refrigerator and bring to room temperature, about 1 hour, or microwave in 15-second intervals, mixing in between each, until soft. If frosting has been frozen, this can take up to 2 minutes total. You can also soften the buttercream over a bain-marie or a double boiler. The frosting will soften from the outer edges of the bowl so mix from the outside, folding the frosting inside. Transfer to a stand mixer fitted with the paddle attachment and beat until soft and spreadable, 2 to 3 minutes.

To make it lemon: Add three tablespoons of lemon curd, per cup of vanilla buttercream.

Next, I put extra lemon curd in between a layer of cake and some buttercream frosting. IMG_6915

I then placed the other cake on top and iced the entire thing, including the sides. This was honestly one of the best cakes I’ve ever tried–and I’ve tried my fair share of cakes. Hope you all enjoy!img_6919.jpg